How To Set Up A Raspberry Pi
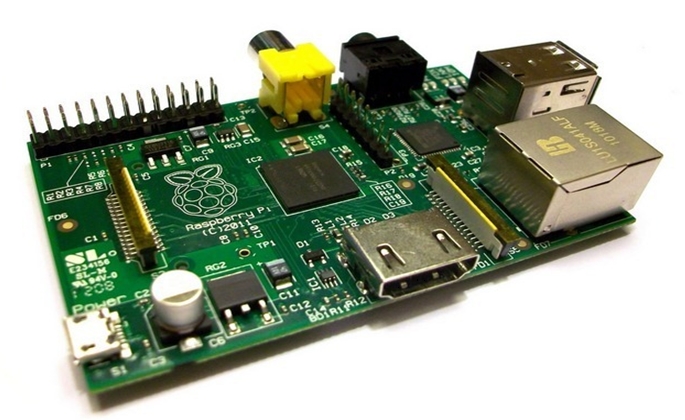
In the last post, we had told you about Raspberry Pi which is a powerful, but can be kept in your Pocket or wallet. If you’re getting very much interested into the Raspberry Pi and want to buy one for $25, you should know how to set up a Raspberry Pi and hence to have a simple and powerful Linux Desktop with an economy performance (Even though we say it’s with economy performance, we could obviously understand that the performance is awesome for such a small price and small requirements). Setting up a Raspberry PI is not that much hard, so grab a cup of coffee and you’re newly bought Raspberry PI on to the table, lets start building
What do we need?
- USB Keyboard
- USB Mouse
- Prepared SD Card (we will discuss this recipe shortly)
- HDMI or Composite Television OR a monitor with DVI or HDMI input, and an HDMI/Composite Cable
- Micro USB Power supply (Buy a Quality one with providing at least 700mA at 5V)
- Ethernet LAN cable (Only if you want to connect it to a network)
- A Cup Of Coffee
So let’s prepare the SD card for First you need an SD car I recommend a 4 GB card and expand it if you can. We have to download the Image files from the site in this tutorial we are installing d Raspbian “wheezy” on our raspberry, a Debian based version, containing LXDE, Midori, Development tools and lot more. You can also try other Linux based Operating Systems In this small Computer. Hope you’d read those list in the previous post.
For downloading the Image Files for your installation procedure, simply log on to the Raspberry Pi Official Download Website and Download the file named “Rasparian Wheez”
You can use either direct link or Torrents for downloading Raspbian Wheez from the official website of Raspberry Pi Foundation.
Torrent: 2012-09-18-wheezy-raspbian.zip.torrent
Direct Link: 2012-09-18-wheezy-raspbian.zip
If you’re using a comparatively slower internet connection, there is a chance for getting some errors in the downloaded file. So you’ve to run a Checksum Utility which can be downloaded from the link given below.
Download the MD5& SHA-1 Checksum Utility
And check the MD5 & SHA-1 match. If both of them match, we could conclude that we’re on the right way.
To generate or verify a hash, simply browse to the file of choice à select either MD5 or SHA-1 à click either Copy to generate the hash or Verify to check its integrity. A Paste function automatically enters the generated hash for verification at the click of a button.
Next step is of setting up memory for device to work. Earlier we have set up the Memory Card (Preferring 4 GB or more)
Now we have to download Win32DiskImager
Now we got all the tools to prepare the SD card
Unzip both files Win32image writer and the image we downloaded
And then from the folder win32diskimager open the .exe file and select the installation ISO image that we’ve downloaded earlier. Then just click write. Now grab the cup of coffee I mentioned above, Wait for the green to fill the tube and when it fills it’s done.
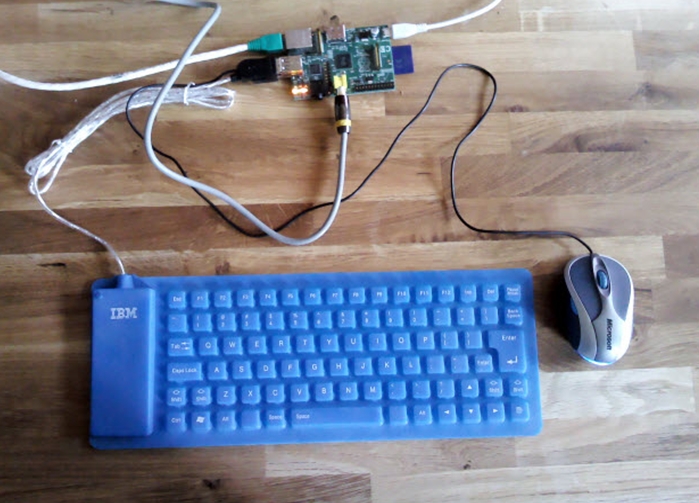
Now just insert the prepared card into the board, and then just plug in the audio, and USB keyboard and Mouse, connect the Ethernet cable if you want to connect monitor through the HDMI port and at last connect the power plug. And switch on the power supply.
There is no ON in the raspberry just power in the power supply and it is on.
When you’ve set up all those things instructed above, the whole system will mostly look like the following image.
Hurray, and you’ve done the configuration part. So you can start booting up the device now.
Now it’ll start booting very much slowly compared to your PC or Laptop. But you don’t want to worry even if it’s slow. If you can see the LED’S are running on the Raspberry your good to go (not the red one) and after it boots you get prompted to type the username and password. You can give the credentials as follows.
Login Username: pi
Password: raspberry
Once you’ve typed the credentials correctly, and then type the following word through connected keyboard of your Raspberry Pi device.
“startx”
And finally we’ve done it now you can see a big raspberry on your screen. The Beautiful desktop is the sign of your working Raspberry Pi. So start enjoying your computing stuff with the small but great Raspberry Pi.


